Lock 的使用

我们知道 synchronize 关键字可以实现线程安全,这个是 jvm 层面帮我们实现的线程安全操作。而 lock 是在 jdk 层次实现的线程安全,那么 lock 怎么使用呢。

  1. ReentrantLock
    ReentrantLock:可重入锁,支持重入。简单意思上来说,就是当线程 1 拿到锁的时候,线程 1 进入同一把锁的其他方法的时候,可以直接进入,增加重入次数。

    ReentrantLock 的使用

    创建一个 Lock 对象。
    调用 lock 方法加锁,下面执行的代码都在同步代码块
    调用 unlock 方法,释放锁资源。

    1
    2
    3
    4
    5
    6
    7
    8
    9
    10
    11
    12
    13
    14
    15
    16
    17
    18
    19
    20
    21
    22
    23
    24
    25
    26
    27
    28
    29
    30
    public class ReentrantLockDemo {

    private static int count = 0;

    static Lock lock = new ReentrantLock();

    public static void inc(){

    lock.lock();

    try {
    Thread.sleep(1);
    } catch (InterruptedException e) {
    e.printStackTrace();
    }
    count++;

    lock.unlock();
    }

    public static void main(String[] args) throws InterruptedException {
    for (int i = 0; i <1000 ; i++) {
    new Thread(() ->inc()).start();
    }

    Thread.sleep(3000);

    System.out.println(count);
    }
    }
  2. ReentrantReadWriteLock

    ReentrantReadWriteLock:读写锁,拥有 2 把锁,分别为读锁和写锁。在实际情况中,数据大多数情况下都是读取,采用读锁(乐观锁)可以减少资源消耗。读取数据时使用读锁,更新数据时使用写锁。

    1
    2
    3
    4
    5
    6
    7
    8
    9
    10
    11
    12
    13
    14
    15
    16
    17
    18
    19
    20
    21
    22
    23
    24
    25
    26
    27
    28
    public class ReadWriteLockDemo {

    public Map<String,Object> cacheMap = new HashMap<>();

    static ReentrantReadWriteLock readWriteLock = new ReentrantReadWriteLock();

    static Lock read = readWriteLock.readLock();

    static Lock writeLock = readWriteLock.writeLock();

    public Object get(String key){
    read.lock();
    try {
    return cacheMap.get(key);
    } finally {
    read.unlock();
    }
    }

    public void put(String key,String value){
    writeLock.lock();
    try {
    cacheMap.put(key,value);
    } finally {
    writeLock.unlock();
    }
    }
    }

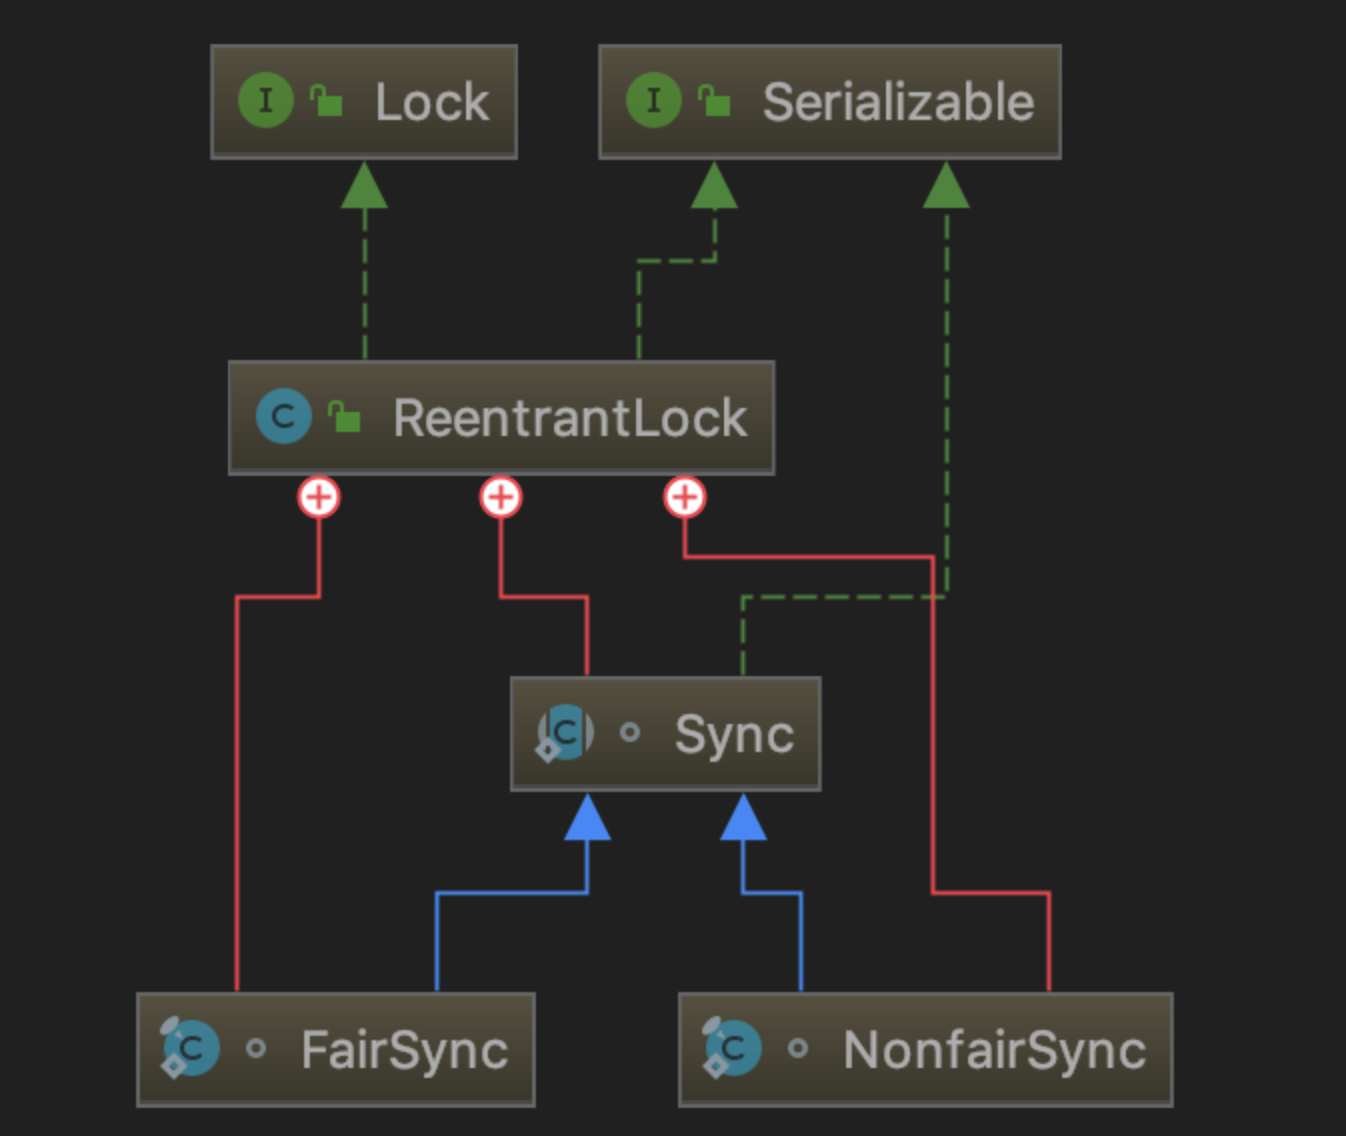
    我们来看一下 lock 的关系图

    image-20210311202626156

    ReentrantLock 实现了 Lock 接口,ReentrantLock 中的内部类 Sync 继承了 AbstractQueuedSynchronizer,实现了 AQS(AbstractQueuedSynchronizer 的简称)的基本功能。

JUC 基本理论

  • JUC:java.util.concurrent java 并发工具包,这个包下面基本上实现了多线程下的各种操作。

  • CAS:compareaAndSwap 由于编译器优化,指令重排,cpu 调度等一些原因,导致非原子操作不能保证同一个事物执行,而执行 cas 操作能保证连续操作同时执行。cas 操作中有预期值,内存值,更新值,当预期值和内存值相等的时候,讲内存中的数据修改成更新值。

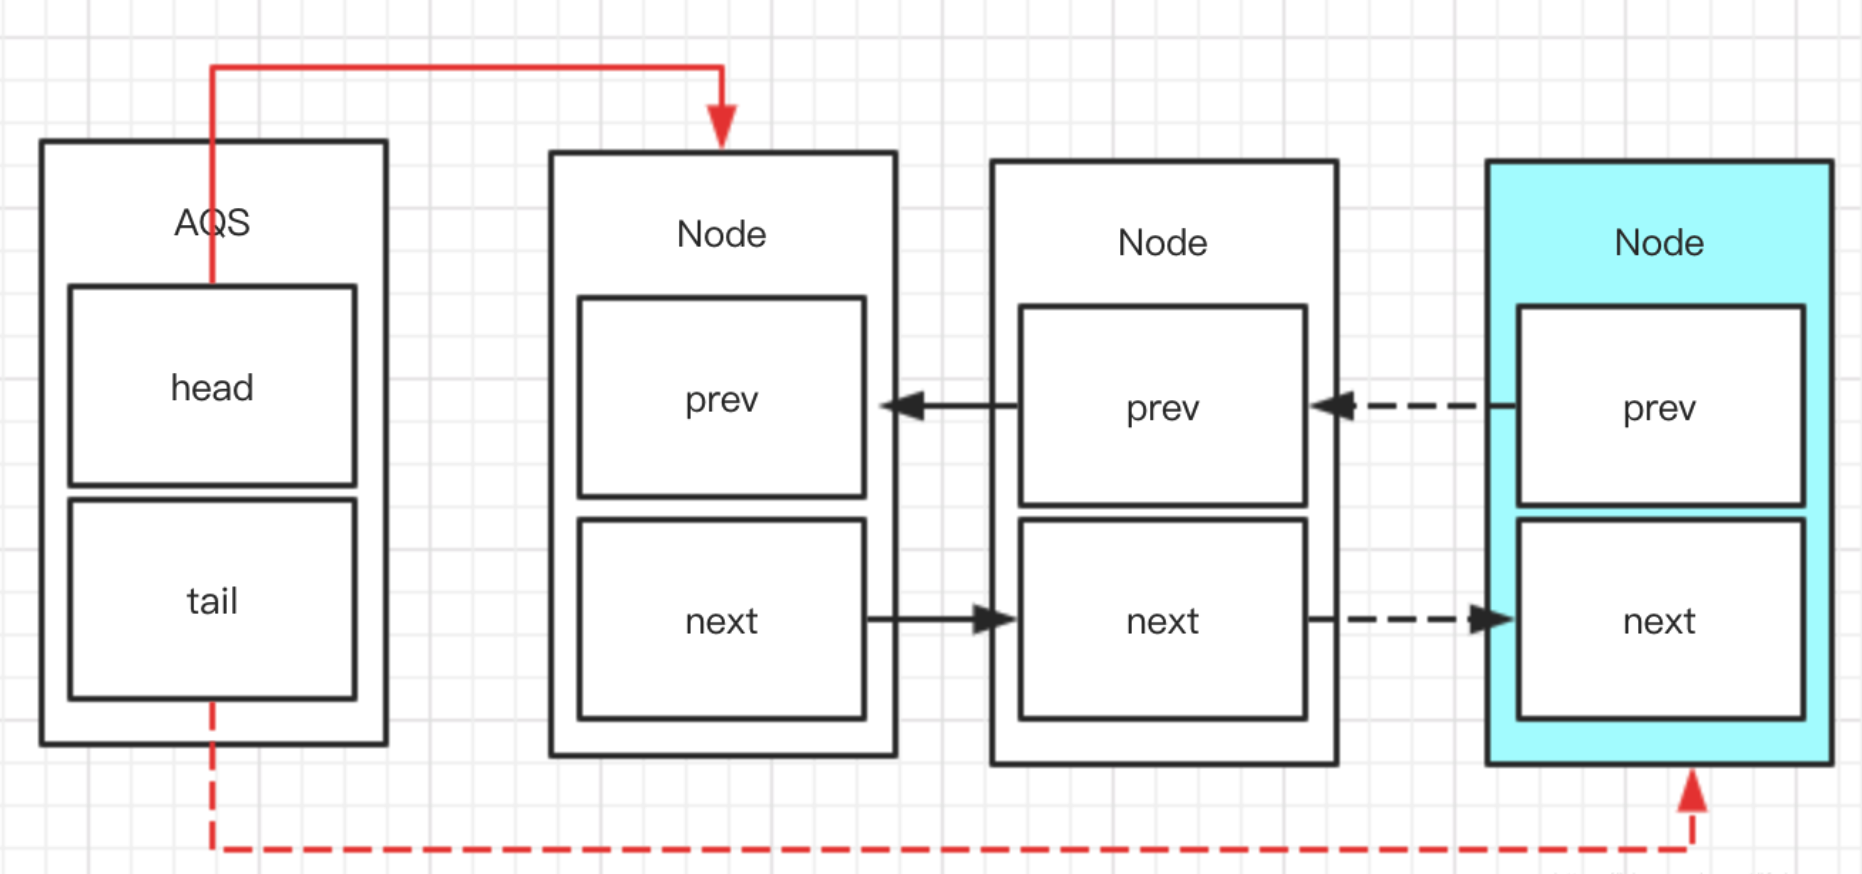
  • AQS:AbstractQueuedSynchronizer ,同步队列,它是实现线程同步的核心组件。AQS 的功能分为 2 种,独占和共享。独占锁,每次只能一个线程持有锁,比如 ReentrantLock;共享锁,允许多个线程同时获取锁,并发访问共享资源,比如 ReentrantReadWriteLock。AQS 的内部维护了一个 FIFO 的双向链表,AQS 定义了内部类 Node,里面含有后继节点指针和前驱节点指针。每个 Node 其实由线程封装,当线程抢锁失败之后会封装成 node 加入到 AQS 队列中,当获取锁的线程释放锁之后,会从队列中唤醒一个阻塞的节点。

    ![image-20210311202725114]/images/image-20210311202725114.png)

AQS 队列增加线程及释放线程流程

增加线程

  1. 新的线程封装成 node 追加到同步队列,设置 prev 节点,将当前节点的 next 节点指向自己

  2. 通过 cas 操作将 tail 节点指向新的 node 节点

    image-20210311202757834

    释放锁

  3. 修改 head 节点指向下一个 node。下一个 node 的 prev 指针指向空

  4. 新获取锁的的节点的 next 节点指向空

    修改 head 节点指向的时候不需要 cas 操作,因为这个时候是获取锁的线程进行操作,只会当前线程独占,只需要将 head 设置为原首节点的后继节点,并且断开原首节点的 next 引用即可。
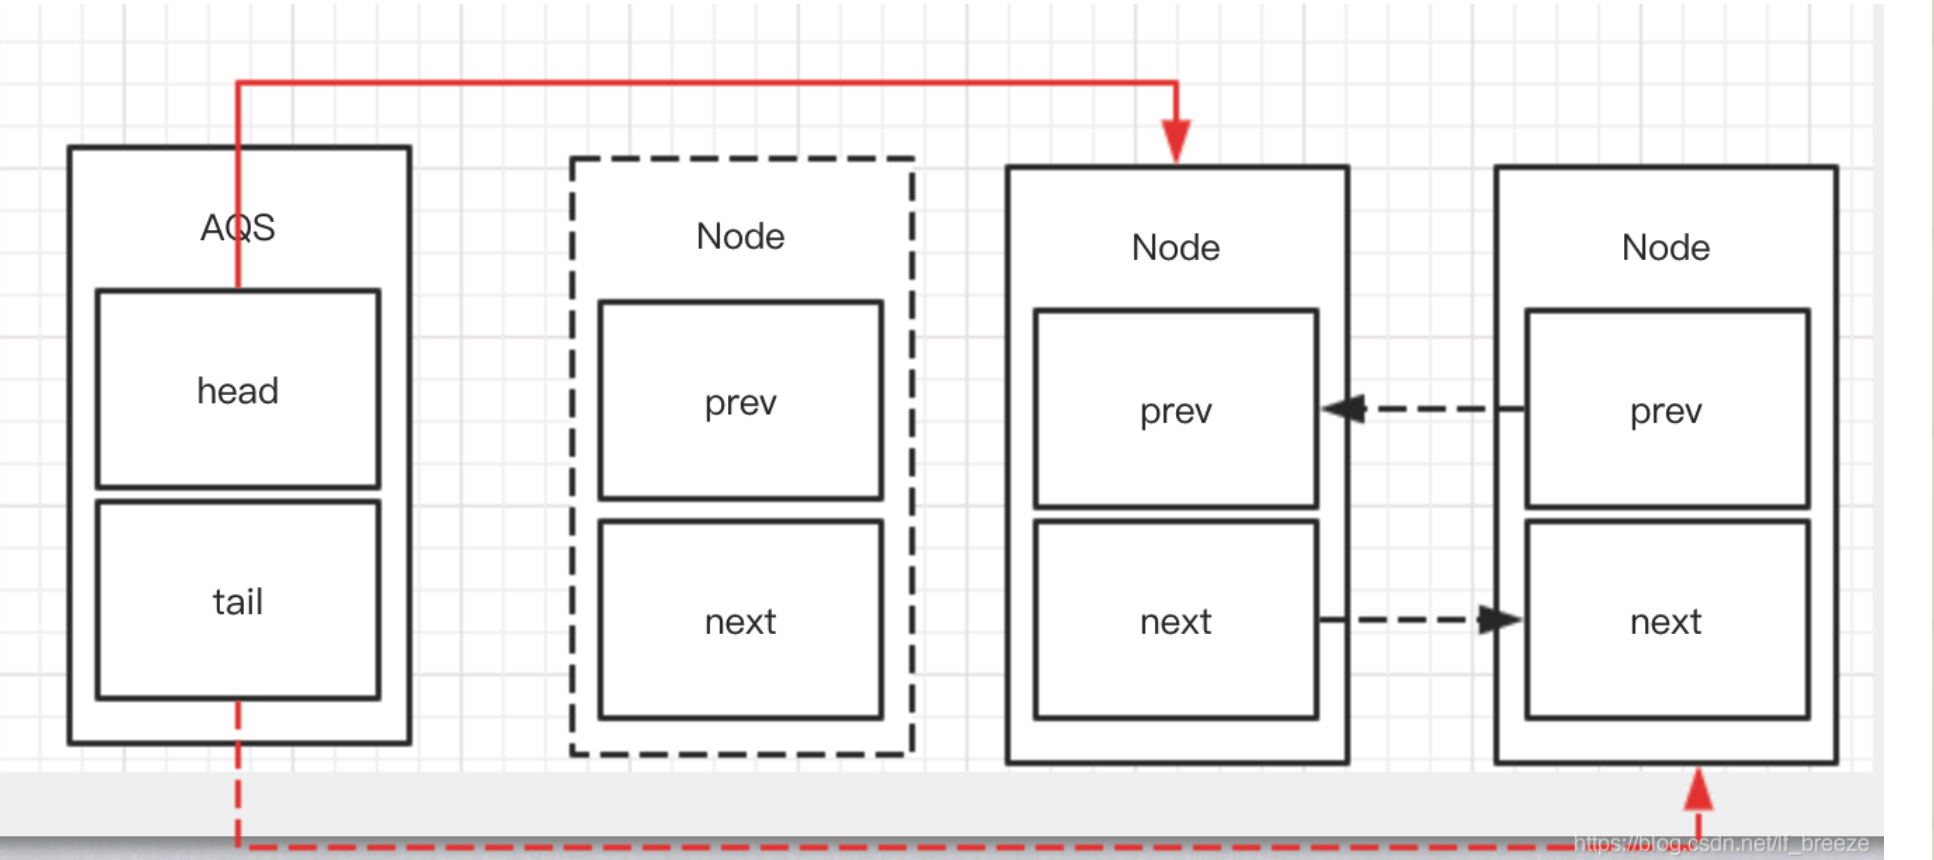
    image-20210311202833072

ReentrantLock 源码分析

ReentrantLock lock 操作时序图
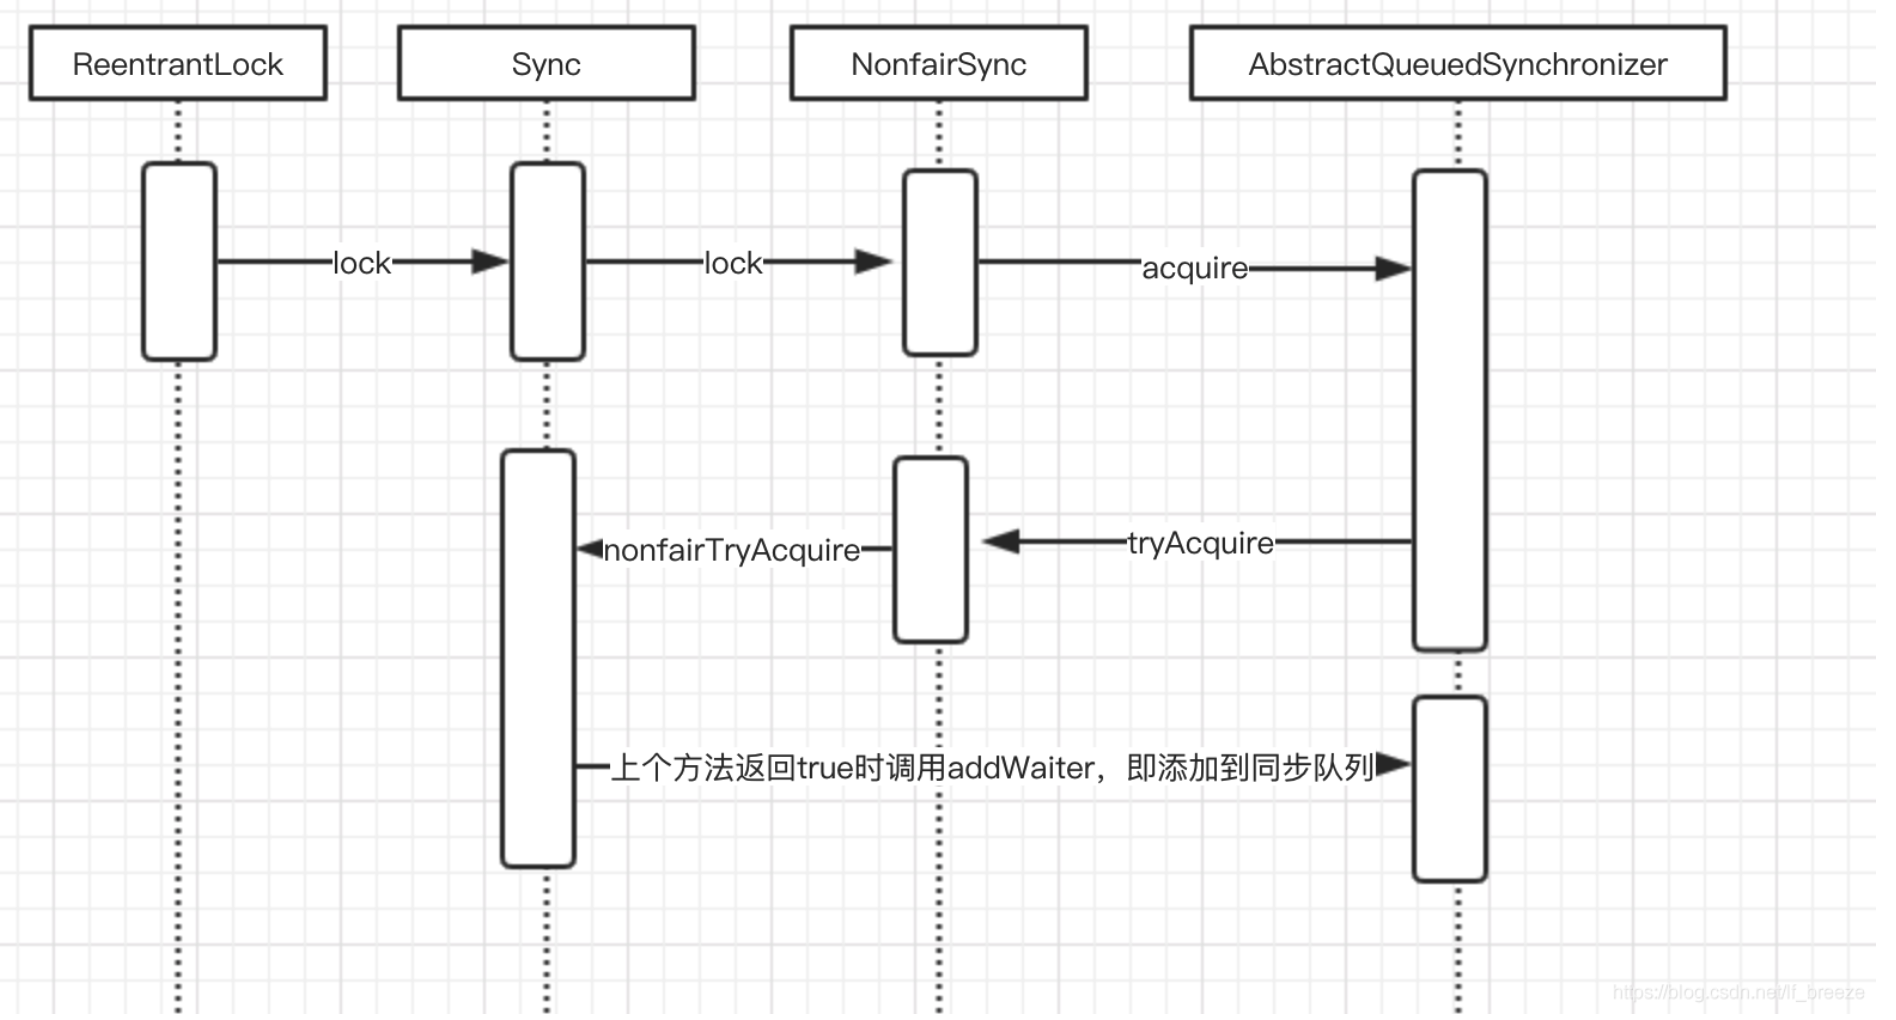
image-20210311202910378

ReentrantLock 加锁的入口

1
2
3
public void lock() {
sync.lock();
}

sync 是 ReentrantLock 的内部类,继承了 AQS 来实现重入锁的逻辑。AQS 是一个同步队列,它能够实现线程的阻塞和唤醒,但是它不具备业务功能,所以在不同的同步场景中,会继承 AQS 来实现对应场景的功能

Sync 有两个实现类,分别是:

  • NonfairSync:非公平锁,不管当前队列是否存在其他线程等待,新线程都会有机会直接抢占资源

  • FairSync:公平锁,所有线程严格按照 FIFO 队列顺序执行

我们这里以 NonfairSync 为例来追踪程序执行步骤

1
2
3
4
5
6
7
8
final void lock() {
//非公平锁,一开始就直接去cas去获取线程锁
if (compareAndSetState(0, 1))
setExclusiveOwnerThread(Thread.currentThread());
else
//获取失败,进入竞争逻辑
acquire(1);
}
1
2
3
4
protected final boolean compareAndSetState(int expect, int update) {
// See below for intrinsics setup to support this
return unsafe.compareAndSwapInt(this, stateOffset, expect, update);
}

这段 cas 代码的意思是如果当前内存中的 state 值和预期 expect 值相等,就更新成 update 值,否则返回 false。

state 是 AQS 的同步标识,当 state=0 时,表示无锁状态。当 state>0 的时候,表示已经有锁获取了线程,并且由于 ReentrantLock 支持重入,那么每重入一下,state 的值就会+1。在释放锁的时候,需要多次释放 state,知道 state 等于 0.

unsafe 是 java 留下的后门,可以直接进行内存访问、线程的挂起和恢复、CAS、线程同步、内存屏障等,而 CAS 是 unsafe 提供的原子操作。

假如 CAS 操作失败,程序执行 acquire(1)操作

1
2
3
4
5
public final void acquire(int arg) {
if (!tryAcquire(arg) &&
acquireQueued(addWaiter(Node.EXCLUSIVE), arg))
selfInterrupt();
}

这个方法的主要操作如下:

1.调用 tryAcquire 尝试去获取独占锁, 如果成功则返回 true,否则返回 false

2.如果 tryAcquire 失败,则调 addWaiter 方法将当前节点封装成 node 添加到 AQS 队尾

3.调用 acquireQueued 方法通过自旋尝试去获取锁

tryAcquire 方法

1
2
3
protected final boolean tryAcquire(int acquires) {
return nonfairTryAcquire(acquires);
}
1
2
3
4
5
6
7
8
9
10
11
12
13
14
15
16
17
18
19
20
21
22
final boolean nonfairTryAcquire(int acquires) {
//获取当前执行线程
final Thread current = Thread.currentThread();
int c = getState();
//判断state是否等于0.是否已经释放锁
if (c == 0) {
//如果无锁就进行cas抢夺资源
if (compareAndSetState(0, acquires)) {
setExclusiveOwnerThread(current);
return true;
}
}
//判断当前线程是否为获取锁的线程
else if (current == getExclusiveOwnerThread()) {
int nextc = c + acquires;
if (nextc < 0) // overflow
throw new Error("Maximum lock count exceeded");
setState(nextc);
return true;
}
return false;
}

nonfairTryAcquire 方法的操作主要如下

  1. 判断当前是否释放线程资源,如果已经释放,就直接 cas 抢占资源。

  2. 判断当前获取锁的线程是否为当前线程,如果是的话,就直接增加重入次数。

假如上一步抢夺资源失败,进入 addWaiter 方法

1
2
3
4
5
6
7
8
9
10
11
12
13
14
15
16
17
18
19
20
private Node addWaiter(Node mode) {
//将当前线程封装成node对象
Node node = new Node(Thread.currentThread(), mode);
// Try the fast path of enq; backup to full enq on failure
//获取队尾节点
Node pred = tail;
if (pred != null) {
//当队尾节点不为空,也就是队列中有节点,将当前node的前置pred指针指向队尾节点
node.prev = pred;
//通过cas操作将tail指针指向当前线程node
if (compareAndSetTail(pred, node)) {
//将原队尾节点的后缀next指针指向当前node
pred.next = node;
return node;
}
}
//如果tail为空,把node添加到同步队列
enq(node);
return node;
}

addWaiter 方法的操作如下:

  1. 将当前线程封装成 node 节点

  2. 判断 AQS 同步队列队尾(tail)指针是否为空,如果不为空就通过 cas 操作将当前 node 加入到 AQS 队尾

enq 方法主要是不断自旋直到将当前 node 节点添加到同步队列

1
2
3
4
5
6
7
8
9
10
11
12
13
14
15
16
17
18
19
20
*/
private Node enq(final Node node) {
for (;;) {
Node t = tail;
//再次判断tail节点是否为空
if (t == null) { // Must initialize
//cas操作将head节点指向新节点,然后把tail和head指向同一个
if (compareAndSetHead(new Node()))
tail = head;
} else {
//当前线程node的前置节点指向原tail节点
node.prev = t;
//将tail节点更换成当前线程node
if (compareAndSetTail(t, node)) {
t.next = node;
return t;
}
}
}
}

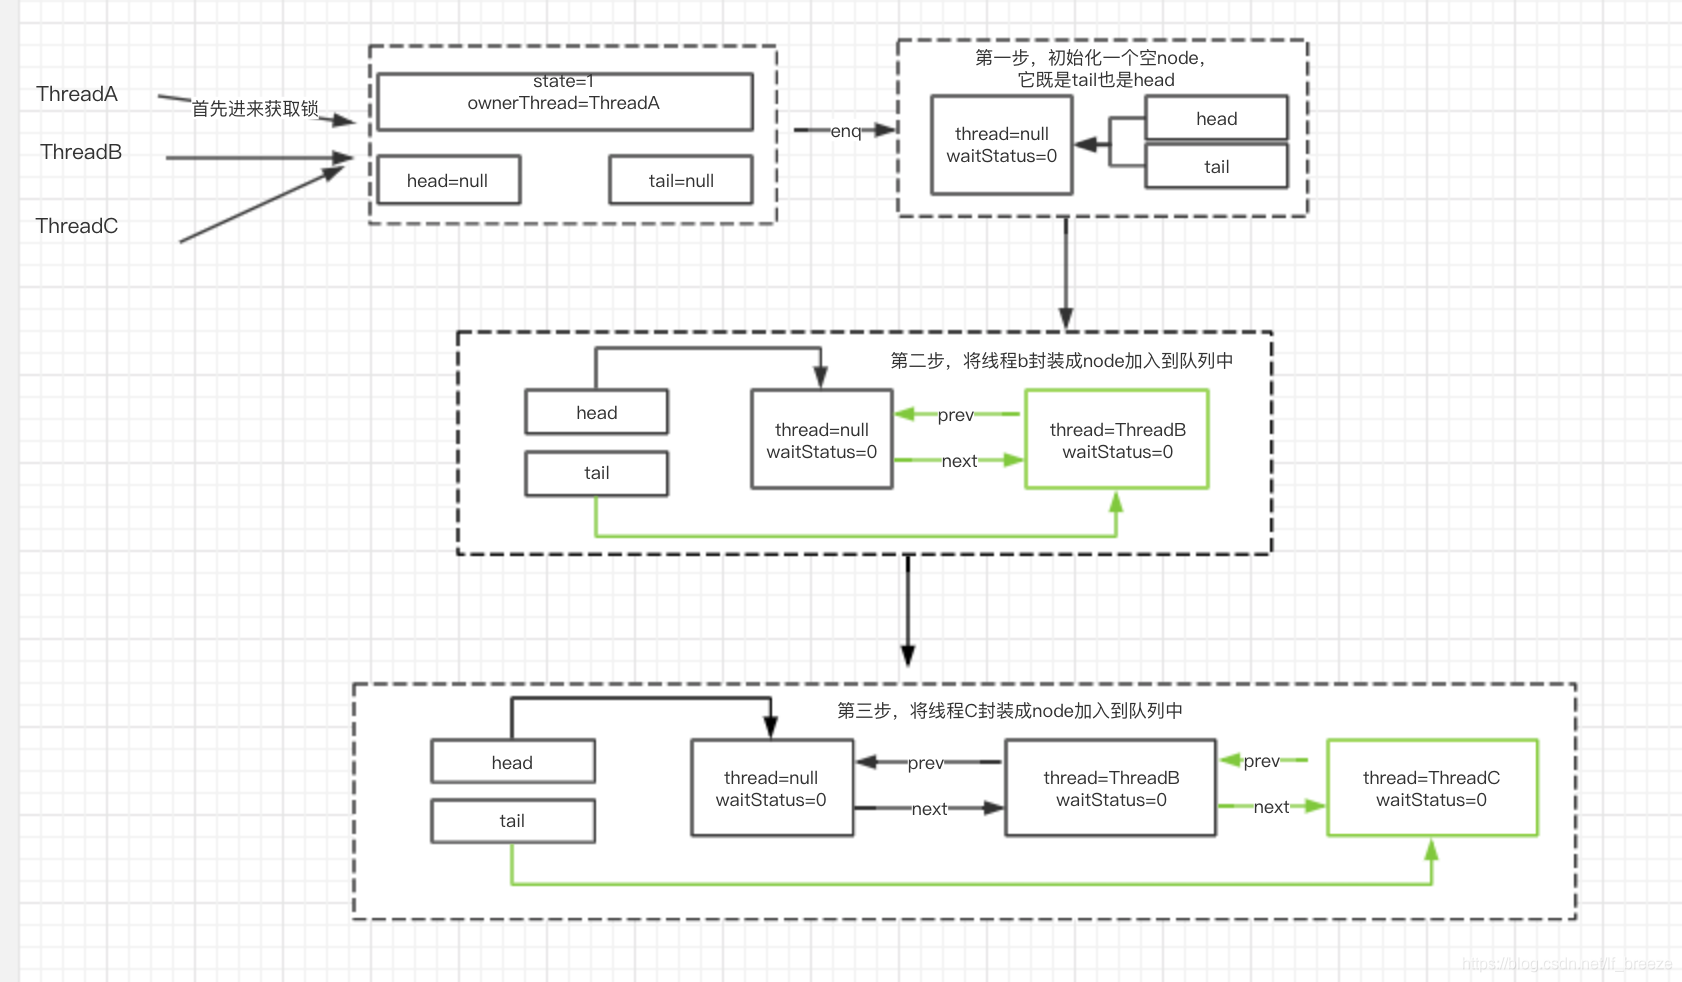
当 3 个线程同时运行的时候的流程图大致如下

20191023140652833

再回到 AQS 的 acquireQueued 方法中

1
2
3
4
5
6
7
8
9
10
11
12
13
14
15
16
17
18
19
20
21
22
23
24
25
final boolean acquireQueued(final Node node, int arg) {
boolean failed = true;
try {
boolean interrupted = false;
for (;;) {
//获取当前锁的prex节点
final Node p = node.predecessor();
//如果是head节点,那么有资格抢夺资源
if (p == head && tryAcquire(arg)) {
//如果抢夺成功,标识线程A释放了锁,设置线程B获取了执行权限
setHead(node);
p.next = null; // help GC
failed = false;
return interrupted;
}
//根据waitStatus判断是否挂起线程
if (shouldParkAfterFailedAcquire(p, node) &&
parkAndCheckInterrupt())
interrupted = true;
}
} finally {
if (failed)
cancelAcquire(node);
}
}

这个方法的操作主要如下:

  1. 获取当前线程 node 的上一个节点,如果节点是 head,那么久有资格去抢夺资源。

  2. 调用 tryAcquire 抢夺资源成功之后,把获得锁的线程 node 改成 head 节点,并且移除原来的 head 节点,

  3. 如果抢夺失败,那么根据 waitStatus 判断是否需要挂起线程,否则重复进行自旋。

shouldParkAfterFailedAcquire 方法

如果 ThreadA 没有释放资源,那么 ThreadB 和 ThreadC 来争夺锁肯定会失败,那么会执行 shouldParkAfterFailedAcquire 方法。

Node 中 waitStatus 有 5 种状态

  1. CANCELLED(1):在同步队列中等待超时或者被中断,需要重同步队列中删掉节点

  2. SIGAL(-1):只要前置节点释放锁,SINAL 状态的后续节点就可以抢夺锁

  3. CONDITION(-2):和 condition 有关

  4. PROPAGATE(-2):共享模式下,该状态下的线程处于可运行状态

  5. 默认状态 0

1
2
3
4
5
6
7
8
9
10
11
12
13
14
15
16
17
18
19
20
21
22
23
24
25
26
27
28
29
30
private static boolean shouldParkAfterFailedAcquire(Node pred, Node node) {
int ws = pred.waitStatus;
//如果前置节点的状态为SINAL,那么只需要等待其他前置节点释放,直接挂起线程
if (ws == Node.SIGNAL)
/*
* This node has already set status asking a release
* to signal it, so it can safely park.
*/
return true;
if (ws > 0) {
//如果状态大于0,也就是说处于CANCELLED状态,循环删除CANCELLED的节点
/*
* Predecessor was cancelled. Skip over predecessors and
* indicate retry.
*/
do {
node.prev = pred = pred.prev;
} while (pred.waitStatus > 0);
pred.next = node;
} else {
//通过cas操作将waitStatus修改为SINAL,
/*
* waitStatus must be 0 or PROPAGATE. Indicate that we
* need a signal, but don't park yet. Caller will need to
* retry to make sure it cannot acquire before parking.
*/
compareAndSetWaitStatus(pred, ws, Node.SIGNAL);
}
return false;
}

此时线程状态图如下:

image-20210311203355968

ReentrantLock 释放锁过程

1
2
3
public void unlock() {
sync.release(1);
}
1
2
3
4
5
6
7
8
9
10
11
12
13
public final boolean release(int arg) {
//释放资源
if (tryRelease(arg)) {
//获取head节点
Node h = head;
//如果head节点不为空并且waitStatus不为0,
if (h != null && h.waitStatus != 0)
//唤醒h的后续节点
unparkSuccessor(h);
return true;
}
return false;
}

tryRelease方法

1
2
3
4
5
6
7
8
9
10
11
12
13
14
15
protected final boolean tryRelease(int releases) {
//state-1,每释放一次减去对应的值
int c = getState() - releases;

if (Thread.currentThread() != getExclusiveOwnerThread())
throw new IllegalMonitorStateException();
boolean free = false;
//如果state=0,则表示当前线程已经释放所有资源,将线程拥有者设置为null
if (c == 0) {
free = true;
setExclusiveOwnerThread(null);
}
setState(c);
return free;
}

unparkSuccessor方法

1
2
3
4
5
6
7
8
9
10
11
12
13
14
15
16
17
18
19
20
21
22
23
24
25
26
27
28
29
30
private void unparkSuccessor(Node node) {
/*
* If status is negative (i.e., possibly needing signal) try
* to clear in anticipation of signalling. It is OK if this
* fails or if status is changed by waiting thread.
*/
//获取head节点的状态
int ws = node.waitStatus;
if (ws < 0)
//设置head节点的状态为0
compareAndSetWaitStatus(node, ws, 0);

/*
* Thread to unpark is held in successor, which is normally
* just the next node. But if cancelled or apparently null,
* traverse backwards from tail to find the actual
* non-cancelled successor.
*/
Node s = node.next;
if (s == null || s.waitStatus > 0) {
s = null;
//从尾部开始扫描,找到head最近的一个waitStatus<=0的节点
for (Node t = tail; t != null && t != node; t = t.prev)
if (t.waitStatus <= 0)
s = t;
}
if (s != null)
//next节点不为空的时候,直接唤醒这个线程
LockSupport.unpark(s.thread);
}

此时线程状态图如下

image-20210317172145823

condition.await和condition.signal

1
2
3
4
5
6
7
8
9
10
11
12
13
14
15
16
17
18
19
20
21
22
23
24
25
26
27
28
29
30
31
32
33
34
35
36
37
38
39
40
41
42
43
44
45
46
47
48
49
50
51
52
53
54
55
56
57
58
59
60
61
62
63
64
65
66
67
68
69
public class ConditionWait implements Runnable{

private Lock lock;

private Condition condition;

public ConditionWait(Lock lock, Condition condition) {
this.lock = lock;
this.condition = condition;
}

@Override
public void run() {
System.out.println("begin condition-wait");
try {
lock.lock();
condition.await();
System.out.println("end condition-wait");
} catch (InterruptedException e) {
e.printStackTrace();
}finally {
lock.unlock();
}

}
}


public class ConditionSignal implements Runnable{

private Lock lock;

private Condition condition;

public ConditionSignal(Lock lock, Condition condition) {
this.lock = lock;
this.condition = condition;
}

@Override
public void run() {
System.out.println("begin condition-signal");

try {
lock.lock();
condition.signal();
System.out.println("end condition-signal");
} finally {
lock.unlock();
}
}
}


public class ConditionDemo {

public static void main(String[] args) throws InterruptedException {
Lock lock = new ReentrantLock();
Condition condition = lock.newCondition();

ConditionWait wait = new ConditionWait(lock,condition);
ConditionSignal signal = new ConditionSignal(lock,condition);

new Thread(wait).start();
new Thread(signal).start();

Thread.sleep(3000);
}
}

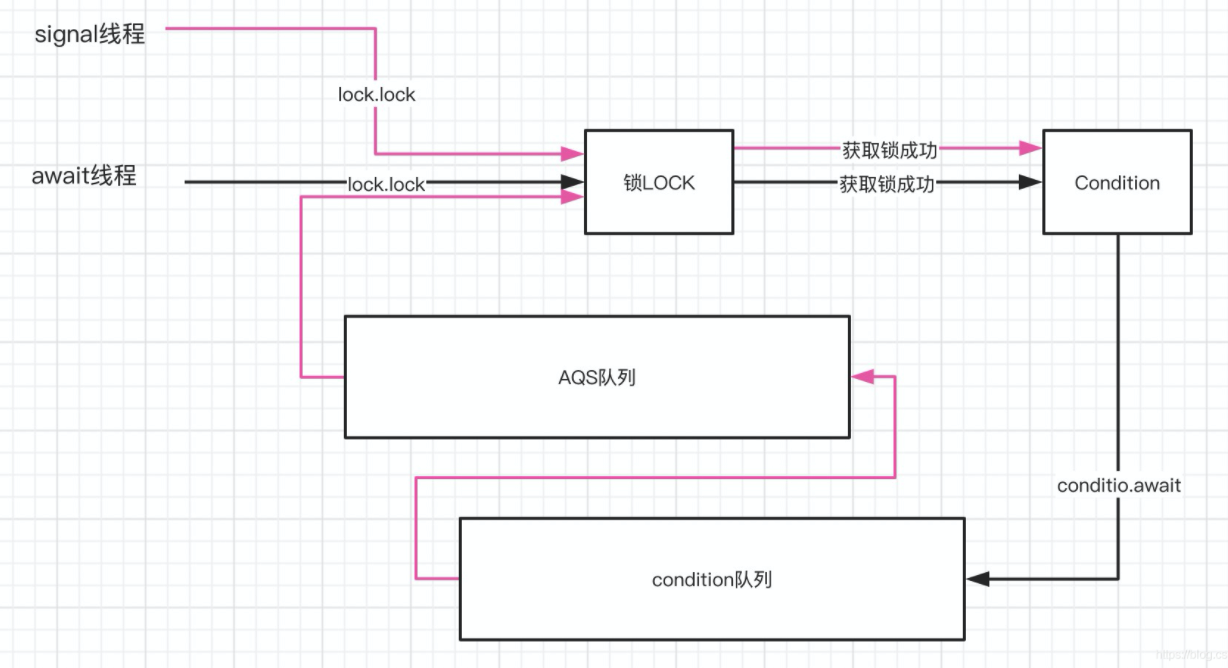
image-20210317172330073

这里存在2个队列,一个是AQS队列,一个是condition等待队列。

阶段1:当await线程执行的时候,添加到AQS队列,由于此时还没有锁竞争,所以awiat线程直接获取到锁,添加到AQS队列的head节点。然后调用condition.await(),将当前线程从AQS队列移动到condition队列,在自旋一段时间之后,直接park挂起线程。

阶段2:当sinal线程启动的时候,此时AQS队列的线程也是空的,所以可以直接运行同步代码。然后调用condition.signal()将condition队列中的await线程移动到AQS队列,由于此时sinal线程还占用同步锁,所以sinal线程执行完之后,AQS队列的head指针从sinal线程指向了await线程,这个时候await线程继续执行后续代码。
深圳市其域创新科技有限公司